|
Early Dolphins built by Marscot/O'Day had/have problems with the glass encapsulated wood shear clamp that over time gets wet and rots causing all kinds of issues - concern over structural integrity of the joint, stanchion fastenings, toe rail rot, leaking and stains, etc. Here in this section we will try to capture information on these problems, and the solution approaches. Yankee built Dolphins seemed to have largely avoided sheer clampleak problems, but one has recently been reported (see October 16, 2016 update)
This page started with an exchange of emails between Halsey McGowan and your webmaster about some problems he found with Elizabeth's sheer clamp that had spread to the main bulkhead. These are familiar problems to many if not most early Dolphin owners.
April 2, 2008 Elizabeth's "soft clamp' and bulkhead replacement project
Subj: infamous sheer clamp
Date:4/2/2008
hey ron,
i was wondering if you could offer any advice concerning the "infamous" sheer clamp. after surveying my boat for the coming season i found some rot in the ply wood at the chain plate and sheer. a chisel and inquisition has proved it to be mostly all rotten. at first my thought was to just replace the bulkhead and scarf a new piece into the sheer, but the sheer is soaked and soft. as all projects, this one is way more involved than first thought. i think i might have to replace the whole clamp. i was just wondering if you had any thoughts/ info about it.
thanks.
halsey
****************************
Hi Halsey
As you probably have read, this annoying problem has been addressed by the Git Rot approach and progressively all the way to removing the deck and cutting out, replacing and reglassing the clamp.
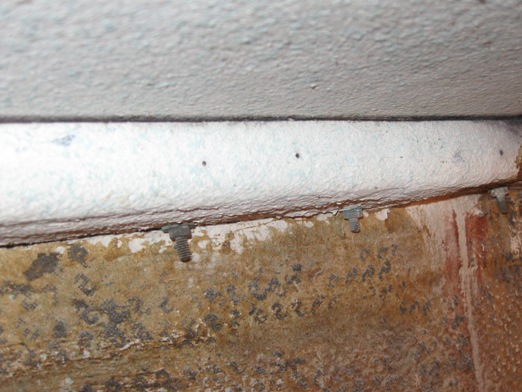
As far as the clamp itself my experience has been, fortunately, limited to the Git Rot approach in areas of the chainplates, the port and starboard quarter stanchions, and the area under the toe rail genoa track. The combination of stress in these areas and dried out caulking/poor bond on fasteners allow a leak that over time gets to the wood and rots it. You can usually see tell tale stains around the problem areas particulary the nuts on the bolts holding on the toe rail and genoa track.
Unlike a standard Dolphin with fiberglass decks Marionette has a plywood deck and her clamp is heavily fiberglassed. I did not have problem with rot in the bulkhead, just a small area on the deck around the chainplate. Here's what I did just this past fall.
1. I drilled a series of small holes in the deck around the suspect areas until I reached wood tailings that were not damp - in my case within 2-3 inches
2. In these same areas I drilled a couple of small holes into the glass under the clamp and put a piece of duct tape tape over the hole
3. I countersunk larger holes on the deck side and start dripping Git Rot until I see evidence under the tape below that it has reached the bottom, and just filled the holes with the stuff - patience, takes a while
4. I removed the chainplates and checked the intergrity of the wood bulkhead and bolt holes - no problems. Then I heavily coated the chainplates and bolts with silicone, let them dry and reinstalled the chainplates
5. Then I repeated 1. 2. and 3. around the chainplate area.
6. Since Marionette has a painted wood deck I sanded the area and repainted the deck - which it needed anyway
7. Then I recaulked the chainplates at the deck
With Passage - a standard construction O'Day - the deck is fiberglass. This boat has been out of the water for 5-6 years and is drying/dried out. We will use/have used the same approach. The non skid was mostly worn away and we sanded the deck smooth and plan to paint it as well
Your bulkhead rot is a different problem and more serious. The bulkhead could fail letting the chainplates move, maybe rip out? I don't know if Elizabeth has an aluminum strut under the mast step? Passage had one and it carries the compression load - except it was badly corroded - I'm sure it caused a stress crack in the fiberglass tabbing to the bulkhead. Marionette has a wood arch and if rot got into it that would be really bad. If you haven't, check out http://www.dolphin24.org/about%20masts_etc.html
Replacing the whole clamp with the deck in place sounds like a lot of work. Maybe easier to lift the deck? I think good quality, well thought out repairs are the way to go. Very major jobs like lifting the deck is for guys who really love to do this stuff. I like it, don't love it.
Anyway, my guess is that you will need to repair that bulkhead and retab it to the hull and deck? Maybe the tabbing is still in good shape and you can fit and epoxy putty the new section into the old tabs? The chainplate load is transmitted from the chainplate bolts mostly to the hull tabbing and compressively vertically on the deck. If the strut is in good condition then the inboard joint of the new section is mostly non structural, I think
If you have the time take some pictures and keep notes. This is valuable stuff for the group.
Ron
*****************************
Halsey's response to the above email is below. He also sent in a picture of the removal of the bulkhead on the port side and a sketch. I embedded my response to the comments in CAPS.
Halsey
My comments are 'imbedded' IN CAPS in your email below
Ron
************************
Ron,
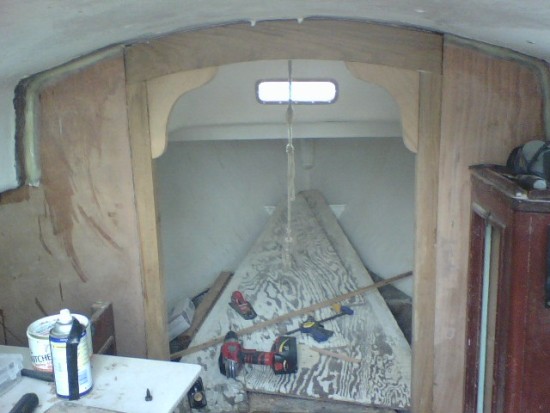
thanks for the good info. i should let you know this all started with a modest project to increase the mast support. there was an aluminum tube that was corroded away just like the picture on the web site. the cabin was showing sings of fatigue. i bought a beautiful piece of oak to make an arch beam similar to the s/s memo. CHECK OUT http://www.dolphin24.org/marionettes_vberth.html
ITS HARD TO SEE BUT MARIONETTE'S ARCH IS SOMEWHAT WIDER, AND MAYBE THICKER, I THINK (I'LL HAVE TO MEASURE IT) AND 'DEEPER' IN THAT ITS VERTICAL POSTS ARE SHORTER THAN THAT SKETCH SHOWS. THE ARCH IS SANDWICHED BETWEEN SHEETS OF PLYWOOD WITH A GOOD ONE SIDE SURFACE GRAIN OUT WHICH GIVES A VARNISHED SURFACE IN BOTH CABINS
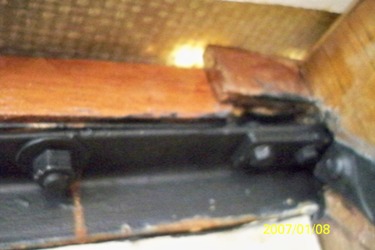
then i noticed the ply wood at the chain plate was soft and discolored. there is always more than you can see, so i dug deeper. peeling back some of the glass over the sheer revealed what i hoped not to find.
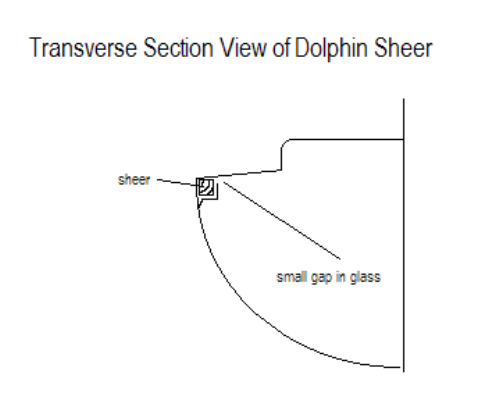
i was thinking that i might be able to use some thing like Git Rot to rejuvenate most of the sheer. there are a few issues that lead up to the rot. first being a leaky deck at the chain plate. secondly the way that the sheer was glassed over. instead of wasting my time explaining it i drew a picture (attached) it allows water to get in and holds it there. (you will have to forgive the drawing, its the best i could do in the library)
|
UPDATED APRIL 26, 2009. NICE DRAWING - MAYBE THIS WAS DESIGNED IN/OUT AIR TO LET THE CLAMP DRY OUT? MORE LIKELY THE GAP IS CAUSED BY THE CLAMP DELAMINATING FROM THE DECK. THE PICTURE AT LEFT IS A SECTION OF PASSAGE'S CLAMP. YOU CAN SLIP A THIN BLADE IN 2-3 INCHES. NOTE THE 2" TABBING TO THE HULL
THE WATER GETS IN THROUGH THE FASTENER 'GAPS' AROUND THE STANCHION BASE BOLTS AND THE TOE RAIL/GENOA TRACK BOLTS - AND ARE HARD TO SEAL WELL IN ANY EVENT - AND POOR CAULKING AROUND THE CHAIN PLATES. UNLESS I AM MISSING SOMETHING YOUR WATER GETS IN THE SAME WAY MINE DOES?
|
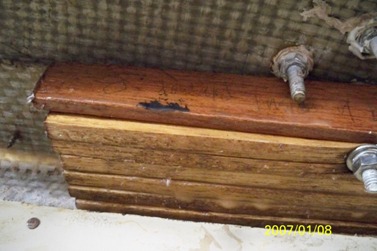
my plan is to remove the fiberglass, (which is rather thick! i am impressed and pleased with the robust construction though) allowing the wood to dry out before epoxying it. then glass over it. the bulkhead is already out and mostly ready for a new one. i am planning on using 3/4" marine. also attached is a pic half way through bulkhead removal.
THAT'S A VERY CLEAN LOOKING REMOVAL ON THE PORT SIDE - LIKE MAYBE THERE WAS NO LONGER A BOND, OR NOT MUCH OF ONE, BETWEEN THE BULKHEAD AND HULL, AND THE BULKHEAD AND FIBERGLASS TABBING? SOMEONE, I FORGET WHO, TOLD ME THEY HEAVILY EPOXY PUTTIED THE HULL AND END OF THE BULKHEAD AND MECHANICALLY, TEMPORARILY HELD THE BULKHEAD IN PLACE, AND THEN NEATLY GLASS TAPED THE BULKHEAD AND HULL/CABIN ROOF TO EACH OTHER. THEY USED A RELEASE TAPE TO ALIGN THE GLASS ON THE BUKLHEAD AND GET A NEAT CONTOURED EDGE. THEN, AS IT CURED THEY FOLDED OVER ANY EPOXY ON THE RELEASE TAPE ON TOP OF THE EPOXY COVERED GLASS TAPE TO GET A CLEAN EDGE. AFTER EVERYTHING IS CURED PULL OFF THE RELEASE TAPE
in regards to big jobs, i am like you i like it, but don't love it. but i am stupid enough to do the work myself, the thought of hiring someone never crossed my mind. i work in the marine industry; from a steel ship to a wooden schooner and tugboats. i am used to doing frustrating large projects on vessels. that's just the way boats are, right? HERE I AM GIVING ADVICE TO A PRO!!
best regards,
Halsey
***********************
ron,
first off i am no pro. besides, its when you think you know what your doing that things go wrong. i never assume to know anything. i have a pretty good plan for a sturdy mast support. the clamp glass doesn't look like who ever did it thought about air flow, more like laziness. most of the water seems to have come in the through the chain plate. in addition the small gap i drew, running the length of the sheer would allow any condensation on the overhead to roll right into the sheer. i plan to glass it over completely. don't let the picture fool you there was quite a bond. i fought tooth and nail to get that bulkhead out. half way through the ordeal i thought to myself "i wonder if i even need to replace it" after the point of no return of course. i wish i could have lived in willful ignorance. but i would stress too much to have a good time wondering when something was going to break.
best,
halsey
*****************************
On April 9, 2009 Halsey updated us on the sheer clamp part of this project, excerpted from his email below:
As for the sheer clamp part of the project I rationalized that the clamp is not as structural as I fist thought, after looking at many other hull-deck techniques on other comparable boats and consulting a marine surveyor friend. This was some what of an easy decision to make since I had the itch to go sailing.
*****************************
April 9, 2009 - Replacing the main bulkhead
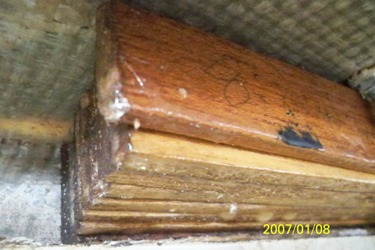
Halsey has replaced his main bulkhead and sent in the following email (edited) and picture
Ron
I've attached a photo of a completed, though "unfinished" main bulkhead and mast arch I did last season. The bulkhead is 3/4" marine ply tabbed to the hull, the arch and pillars are 3" thick white oak. the arch extends behind the bulkhead, and the pillars sit on a floor beam (not pictured) of white oak to help distribute weight. I am very happy with the results, it's solid as a rock.
I plan on painting the plywood white and varnishing the oak
Halsey
*******************
July 21, 2009 More on the Infamous Sheer Clamp
One of our website readers has been looking at O'Day Dolphins he might restore, and one of the issues he is looking at is installing a new toe rail. This resulted in an exchange of emails with your webmaster that has produced some information that may be useful to others. What follows is a series of photographs of Passage, Marscot/O'Day hull #12's clamp and toe rail, and your webmaster's response, edited and expanded for this discussion.
|
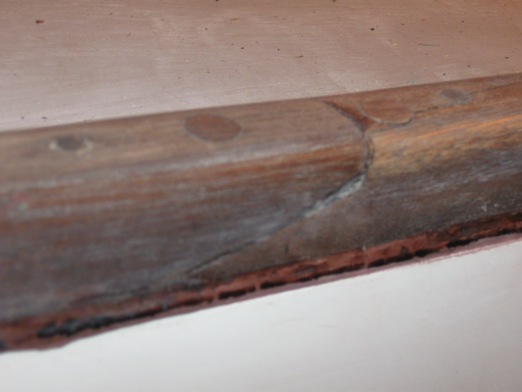
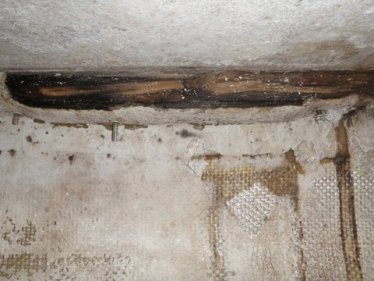
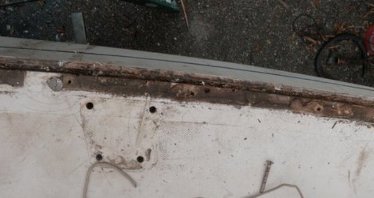
This photo is inside looking at the port side midships. Note the separation between the 'clamp' and the underside of the deck. The flange is that glass raised section on the hull - it wraps around underneath the clamp, ending I think, at the underside of the deck - but not bonded to the deck with a flange . It is not clear to me whether or not the wood clamp inside was ever bonded to the underside of the deck - or whether or not it should have been bonded to the deck given the stress parameters.
|
|
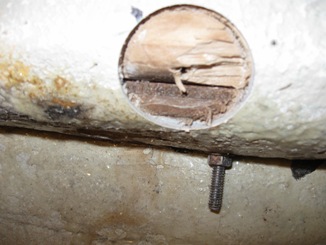
This photo shows a cutout and the thickness of the glass flange. It seems that the original design was a simple shaped flange heavily glassed to the hull, into which was placed a 2'" x 4"? plus another wood spacer, and the other end of the flange was intentionally not subsequently bonded to the underside of the deck. |
|
This is a photo of the toe rail section near the aft end of the cabin - and where there was a scarf. The toe rail bolts are 1/4 20 and are bolted through the deck and 'clamp' and flange under the clamp, and is backed by a standard size 1/4 20 washer. Generally, they are spaced on 8" centers in the front half of the boat and on 6" centers in the rear half. In the above picture there is a also a toe rail bolt under the plug at each side of the scarf joint. Collectively, these bolts are the mechanical fastenters for the deck to hull joint.
The toe rail dimensions are 1 1/4" high x 1 1/2" wide at the base, tapering slightly up to the top into the radii.
The genoa track was removed from the top of the toe rail, the bolts were pulled, and those holes plugged. The plugs are different sizes because the toe rail bolts are countersunk heads, while the track holes are shaft holes only - the heads are on the countersunk track.
|
The new boat, as delivered, must not have had a genoa track mounted on the rail. It must have been added later. The track bolts are also 1/4 20 through bolted with standard washers. They are on 4" centers. Its pretty clear (to me) that if a new rail is going to be installed, and a track is wanted on the rail, the track bolts are all that are necessary in that area, and the toe rail bolts can be eliminated - except where there are scarfs. The fewer holes the better.
|
This is a side view of this same section. You can see the vertical edge of the hull laminate, a gap, then the horizontal edge of the deck laminate. Not good. This void can be filled with something but the deck and hull flex and eventually, a gap will open and water will get inside. Even if it does not leak into the cabin, it soaks/rots the wood, freezes in the winter, expands and opens up more voids. Need I go on? So this design leaves a lot to be desired - and is no wonder called the infamous sheer clamp.
|
Over the years owners have made many modifications and repairs to this clamp - including removing the deck and starting all over. Any existing hull/deck joint system needs to be evaluated both as to its design, intermediate repairs and improvements, and condition, before you decide how to proceed.
Given S&S's excellent design reputation one might wonder how this mess came to pass. I have a copy of the S&S Dolphin 24 Construction Plan, # 1497-5, dated May 11, 1959. On it is a section called:
RESERVATIONS
1- DK TO HULL CONNECTION - (O'DAY FLANGED HULL & BOLTED AND BONDED)
2. TOE RAIL (O'DAY - WOOD)
At this time O'Day had no manufacturing facilities, nor, to our knowledge, an engineering/design department, so we might assume this reservation was as a result of input from Palmer Scott's Marscot Plastics?, the company that built the first Dolphins and that would eventually become O'Day Manufacturing Corporation.
Maybe we can find out if this was the first time this particular construction method for a deck to hull joint was used? If not, maybe we can find out if it had been used on other boats built by Palmer Scott (or others), and what the experience was with those boats? Stay tuned.
********************
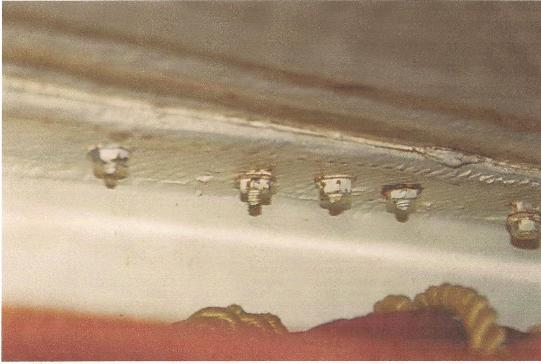
May 17, 2010 Jim Robinson, Aquila, Pacific Dolphin #273 sent in an email and photo of his boat's clamp.
|
Ron
Months ago you asked about deck to hull fastenings. Here is a picture of the hull /deck connection port side alongside the settee area. This is typical of the boat, upon inspection. She has remained tight and dry after 30 years.
Jim
********************* |
May 28, 2011 Check out Clinton Hodges' report on his work with Windswept too, Yankee #245 relating to the general subject. Click here
*******************
June 22, 2011 - Here is another report on this subject from Clinton.
Ron,
This is to touch base with you on Windswept toos' progress which is going well, but some aspects of the refit is hindered due to cooler, and wet weather lately. At 48f, it's just 8f above the West recommendation for use of 205/105 epoxy. Using metered pumps, West says it should kick-in around 9-20 minutes. It's taking every bit of that, and not altered by the use of colloidal silica either. It's currently 58f, sprinkling, and I'll soon be out of things to sand.
The teak, port toerail came apart in one piece, the starboard in two. It is my unqualified opinion that the teak is serviceable, but it has seen better days; both toerails will benefit from the assistance of epoxy. It is my understanding that the toerail strengthens thedeck/hull joint.
|
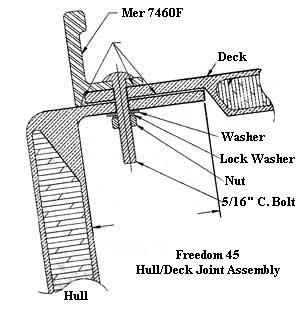
There are many examples of beautiful teak toerails, both old and new, and my skill level to repair the old is adequate, but replacing with new-questionable. At what point is cosmetically pleasing, old teak, still capable of its main purpose of providing support for the deck/hull joint? I have no way of knowing the answer to this. I suspect it's time to go with new, and I don't have the skill to install a new teak toerail. Rig Rite, carries Merriman 7460F toerail (see left), that I think would be suitable for later Dolphins. Crest aluminum carries the old style C&C that may work as well. In both instances I like the t-rail track that integrates with the toe rail. Spendy, yes, but so is finding a qualified boat builder, and to install new teak. Do you have any input regarding aluminum toerails? Nope
Back to the existing toerail. At some point in her past, someone decided that the meanest, nastiest, hardest adhesive was the way to go. in attaching the teak toerail to the deck. Sanding the toerail, repairing it with epoxy, and finishing it will take a fraction of the time that it will take to remove 48' of old, hardened adhesive. Enough said. |
All four of the thru hulls are removed. I'm waiting for two new thru hulls, and one flanged seacock. Two thru hulls will be flanged, and capped. Waiting for one more gallon of Pre-Kote, then I can begin painting her topsides. I'll keep you posted on her continuing progress.
Warm regards,
Clinton Hodges
s/v Windswept too
Anchorage, AK
********************
June 16, 2012. Check out the following series of Forum posts on toe rails http://dolphin24.org/forum/forum_posts.asp?TID=119.
The following is part of Scot Ioset's Prodigal, Yankee #204 thread consolidated and minor edits - it was uplifting to read! Maybe this kind of project is not a nightmare...
We have decided to create a new toe rail all around, as he has a wood steamer that can expand as long as needed to allow us to prebend the toe rail to fit perfectly. Now to find long plank teak
I have located teak locally here from a friend in upstate NY. We are going to remake all toerails, including the stern. We have a long pipe for steaming the wood to bend it to proper form. My teak was in shabby shape, and with a full exterior restoration underway, I figured now is the time to do it.
We have all the teak acquired, cut and shaped and ready to steam and set on a forming jig. New toe rails, eyebrows and other accent trim. New teak is gorgeous and I will take lots of pictures in the coming days and forward them to you. Prodigal is looking like a new boat!
We have completed the restoration of Prodigal and we put on the new toe rails this week. My carpenter went on several internet blogsites (GOOD MOVE!!) investigating the proper way to handle teak, because it is like no other wood in its properties. We put the two rails in the steaming tubes overnight and the next morning they came out like noodles. He was told by an "expert" to place the pre-drilled teak right on the boat, drill and screw it down to position, then wait a few hours for the wood to set, then remove the screws and place sealant.
Screws alternated with bolts on the rail. When he backed out two screws, there was a bang like a gun on the starboard fore railing and a piece blew off to the floor! Certain sentence enhancers were expressed, then he epoxied the pieces back together and did a beautiful job of blending teak saw dust and 5 minute epoxy together to fill the cracks. Turned out almost unnoticeable. Needless to say, there is a lot of energy in the wood that takes time to relieve itself. Therefore we waited, and late in the day removed one screw at a time, placed clear silicone marine sealer down the screw hole and replaced the screw prior to proceeding to the next. No more disasters. We finished with 1/2" bung plugs. You can get two plugs out of one by rolling the blade of a carpet knife over the plug until it splits. This also results in the bung plug fitting flush or near flush, minimizing the amount of hand sanding. This is not the time for power sanders.
Finally we finished with two coats of Sikkens Cetol for natural teak which we hand rubbed into the wood. Turned out beautiful!
****************************
June 21, 2012. We have a 'Pro" in our midst, Jay Picotte (Recovery) He is the Curator at the Museum of Yachting, and before that was at the International Yacht Resoration School in Newport. He has a teak topped fiberglass coaming that he has painted to look like wood, plus has painted his toe rail. I asked him what he used. Here is his answer
"Petit brightwork brown and z-spar teak brown are what I've used but recently I've seen a paint by Epifanes that I like much better, not sure of the color name". Pictures on Recovery's page
************************************
April 28, 2014. A couple of more 'Pros' recently had a discussion regarding bedding of replacement toe rails and deck hardware. They are each currently restoring very early Marscot/O'Day built boats (Bill Thomas - Ruby #4, and Jerry Slaughter, ROWDY, #5). Hopefully, sharing the pain, and the light, will be useful. Here is the interchange (minor edits)
Hi Bill,
I remember reading you would be bedding hardware with a silicon sealant. I'm facing bedding my toe rails and was bouncing between using life caulk or dolfinite. I've got some pretty big hull to deck seams to seal up and the supplies could get a bit pricey. If you have any cost effective suggestions, I'm all ears.
Ron, feel free to chime in, I value your opinions and years of experience in fiberglass boats.
Thanks to both of you,
Jerry
****************************
Hi Jerry,
I might have miss stated the use of silicon calk. For me it’s a real pain and I don’t use it on my boat. On our boat I spent hours ( and hours ) cleaning silicon off the woodwork and trying to get paint and finish to go down over areas where old silicon had left behind a residue. I’m bedding all the wood and fittings on my boat with 4200.
Hope this is helpful.
Bill Thomas
***************************
Bill
Thanks for getting back to me. Your stock just went up several points (silicon revelation). I've only used silicon, without fear, on my portholes. I'm going to look at a 3M product 4000. Me and 4200 have a love hate relationship. It seems to kick off too quick for a slow toe rail re-attachment. It probably has something to our air temps here in south Texas.
Thanks again,
Jerry
**************************************
Hi Jerry,
The 4000 would be great. I’m a fan of looooong working times. It keeps so much trouble from happening! When I work with epoxy I use MAS with their slow hardener. I’m about to reinstall my coamings. I think there might be a bit of brown calk in the mix at some point.
Bill
*********************************
For those of us who just have to just get by - here a 'non professional confession' re toe rail/clamp leaks.
Hey pros
My amateur 'solution' to leaking toe rail bolts is not going to go far with you guys. First, tightly roll a piece of white towel paper about 1-1.5 inches wide and press fit it between the bolt end and the side of the hull. Small leaks generally get absorbed by the towel paper, which then dries out until the next leak attack - usually a season long fix ....The white towel paper blends nicely with the white background.
Some of the bolts 'stain' when they leak - a bad thing. With this fix the stain gets absorbed by the towel paper and does not leave a stain run down the inside of the hull, a good thing. These stained bits of rolled towel paper require periodic replacement. Badly stained bits of towel paper identify those areas that get Spring fix treatment - 3-4 small holes drilled though the plywood deck angled toward the clamp near the bolt, taped at the bottom, and then filled
with Git Rot - marginally works.... (see April 2, 2008 comments above near top of page)
On the outside edges of the toe rail joint with the hull I use brown/mahogany Life Caulk to fill gaps and space. None of this makes me very happy but its got me thru 18 years....
Ron (Marionette, #12)
**********************
Hi Ron,
I don’t know of anyone that could argue with 18 years of success!
Bill
******************************
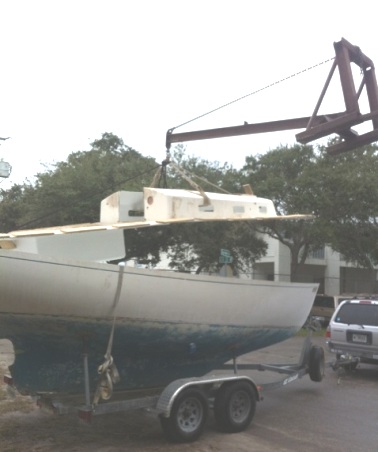
May 4, 2014 - Bob Pitt (Conch Pearl, #16) is going to tell us how #16's hull/deck joint/clamp problems were resolved (minor edits).
Ron ,
As several are weighting in on this topic, I thought I would put in my 2 cents worth. Conch Pearl, # 16 , has a completely new glass hull deck joint. When she was taken out to the local fish house to have some glass work done, the guy wanted to take the deck off to do a better job of it. After removing the old wood clamp, grinding the entire hull inside, the deck bottom and glassing over all unused holes (there were a lot), the deck was reinstalled with2 layers of 18/08 by 8" biaxial tape staggered 6" on deck, 2" on hull , 2" on deck, 6" on hull, to reduce grinding.
Placing the deck back on the boat required screwing pieces of plywood along the deck edge to keep the deck from dropping into the hull. This was followed by one layer on the outside, and gelcoat. This took almost 5 gallons of gel. The only wood that was left in was the ply on the cockpit bottom, now Coosa board, and the cabin sole, with 3/4" ply.
This left a very clean under deck where a.ll the bolt for toerails, stanchions, tracks and cleats to be bolted. This was done about 2 months ago. The project in hand is engine installation along with the attendant parts like beds, shaft, & stern tube, and exhaust. The list goes on and on.
Hope and Courage, Bob Pitt
Below are a couple of 'before" photos with Bob's comments from December 16, 2103. Today, we have rec'd more photos and have set up a special page covering Conch Pearl's new hull/deck joint.
|
The hull/deck clamp (left/above) will have to come out in sections and be reglassed to maintain the shape. I will look into hiring a couple of hungry glassers to do this.
|
|
Actually, the entire deck came out!!
Click here to go to that project |
*************************
October 16, 2015. Larry Hill, new owner of Yankee #129 posted the following on the Forum. We'll try and get a couple of photos - if they exist.
Topic: Sheer Clamp Replaced on Yankee Dolphin 129
Posted: 14 Oct 2015 at 7:29pm
I have Yankee Dolphin 129 "Respite". The sheer clamp on the port side of the boat was rotted and powdery. I did not want to take the cabin off to replace it, so I decided to do it this way:
To keep the proper curvature in the clamp, I used a piece of Philipine mahogany which I cut into 3/8" thick slats. I slid each slat in and made the necessary cutouts for the bolts and screws that it had to slide past. After sliding them all in and making sure they were in the right order, I numbered them.
I applied a thin coat of epoxy to each slat and allowed them to dry. Later, I had my wife put on another coat of epoxy on both sides of the slats and I slid them in one by one over the bolts and screws and against the hull while the epoxy was wet. I clamped them in where I could with wedges (I used plastic wrap to keep the wedges from sticking to my clamp). Where wedges would not fit, I cut 2 x2's or 1x 2's the proper length so I could force the laminated slats tightly together at the bulkheads.
When it was all good and dry I drilled holes for the deck fittings and sealed them with 5200. I resealed all of the deck fittings. The boat does not leak and I did not have to take the cabin off.
Larry
March 11, 2016 Postscript: Larry posted the following on the Forum in response to a query http://dolphin24.org/forum/forum_posts.asp?TID=290&PID=1019#1019
Unfortunately, I took no photographs. The repair job,making the sheer Clamps and installing them worked well because we have since took the boat sailing in high winds and the rigging held together quite well.
April 25, 2016 Postscript. Here are the photos
*************************************
November 20, 2018. Mark Steinhilber is a marine architect who 'grew up' on his dad's Dolphin, Rascal. Over the website years Mark has offered his insights on many Dolphin projects. Here is his comment on the use of Git Rot in Mike Gooch-Breault's restoration of Passage
Good to see the updates on Passage's restoration. The Git Rot activity brought back a lot of memories from Niantic Boat Yard.
The benefit for Passage is having so many years for the shelf/clamp (whatever it’s called) to dry out in inside storage. Hopefully the dry wood wicks up the Git Rot like a sponge. We tried to do the same with the rails removed and the deck screws out, but we did not lift the deck and cabin off. We had a lot of water in there, so we had to drill drain holes inside through the glass tabbing next to the hull. It didn’t work too well for us since it wasn’t dry enough.
I think it can be a good solution if there has been a thorough dry out and, if the wood is not all pulp, to use Git Rot to preserve the beam. For a beam too far gone, I think I would cut out 2 to 4 foot sections and lay up a nice thick flange in place to bond the deck to the hull. Perhaps an aluminum angle iron could be included on the interior of the lay up, in way of the genoa track, cockpit winch area, forward to the chainplates or even beyond. S&S designed the joint to gain strength from the wood, but the Lunn built boats have been fine with just a glass flange (and are lighter up high).
*********************************
|
|