|
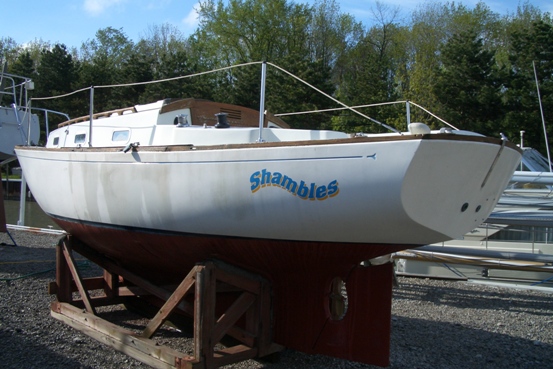
Matt's first email about Shambles is excerpted below.
June 30, 2007
"I have hull #203 from Yankee Yachts, built 1970 (or 1971). I carry a Vire BVR inboard motor. We are currently located at Grosse Ile, Michigan. I can't tell you much history except that the last couple of owners did not sail her much and she was not well maintained. I am in the process of cleaning the boat up and trying to restore her to her former glory. I am currently racing in Lake Erie with some success in a non-spinnaker class. As soon as I get another crew trained we will see how we fair with the PHRF fleet.Built 1970 or 1971.
Owner Name Port Year
Robert Hobson unknown (Sunflower?) unknown (Lake St. Clair MI) 1973
Nick Paver Sunflower Lake St. Clair 1995
Lynn Morden Shambles Lake St. Clair 1998?-2005
Matt Bemis Shambles GIYC, Lake Erie, MI 2005-current
Dates of ownership are unclear, but I had some old papers that came with the boat and had some names and dates on them. I will add some more pictures soon, these are from when I first got the boat. The teak is all cleaned and oiled now but some sections need replacing. Also a new layout for all running rigging going to cockpit area.
The holes (in the transom) were indeed for an old outboard motor bracket which I still have. I have since gotten the inboard running, but no sense patching the holes. After all, they quit building the inboard Vire BVR motor 35+ years ago. I did not like the idea of all that extra stress on the transom, not to mention the extra drag and weight in the water having two props and motors...
I will start writing about the restorations I have been doing and forward it to you. I will also try to include some photo's. (Digital cameras are great!)"
Til Later, Matt
The following report came in from Matt 7/12/07
I got the boat at the end of the Michigan sailing season in 2005. As it turns out, Shambles and I are about the same age. Call me sentimental, but her age, as well as her classic lines just seem to call to me. I also like the stability of this boat as I have two young children and a nervous First Mate! The name came with the boat, and a fitting name it was. She was in shambles. Don't get me wrong, I am not talking about a disaster here, Shambles just wasn't given the TLC she deserved. Anyway, on to the project.
When I obtained the boat I had to sail her to her new home. Which was a great sail down the Detroit River with a chute up all the way down. While doing so, the tiller which had never seen a fresh coat of varnish decided to come loose. The wood between the connecting bolts had finally just given out. As luck would have it I was just outside of the yacht club that was to be her new home and I was able to hold the tiller on by hand well enough to get to the dock. So, my first project was afoot. I was able to find a new tiller at the local West Marine store, but a little modification with a belt sander was necessary to get it to fit correctly. A little varnish, and we were ready to sail again.
I have tried to prioritize the projects to be done. Sometimes these priorities change due unforeseen events, but the first big project was the motor. This project is a story in itself, but I will give a brief summary. The boat came with two motors attached. One outboard, and an inboard in pieces. I felt that the IB was the way to go, so after the haul out I removed the motor mount and went to work. The first problem was simple. I now had four holes in the transom that I decided to just use bolts and some good marine caulk to seal up. If ever I need to I can re mount the OB motor. The larger problem was the Vire BVR (see www.vire6.info/ ) in pieces. They quit building this motor around 1969, and finding parts was a chore to say the least. To make a long story short, a new set of points and a rebuilt carburetor, and we were in business. Well, almost. There was also a leak in the shut off valve for the cooling water. Probably from water freezing while in the off position. After removing and rebedding the through hull fitting with the same trusty marine grade caulk and installing a new sea cock, we were now ready to go.
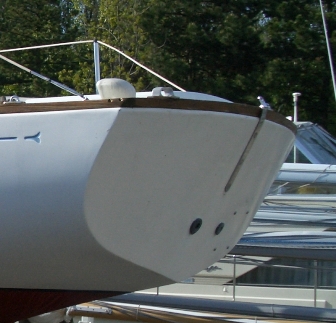
Note the four bolts near the bottom of the transom from the old motor mount. I did not like the idea of the extra strain on the transom.
The next big project was rigging and sails. The sails were very old and in desperate need of replacing. Any one who races sailboats can tell you that buying sails is a non-stop project, so I will just move on to the rigging. Originally the boat had two halyards run to two mast mounted winches, two primary winches for headsail trimming, and a pin-stop type traveler for the main and headsail. My intention from the start was to do some racing, so this arrangement was not going to work for me. The first thing I did was to add another halyard and a topping lift for the spinnaker and run it all to the cockpit (details below). I also added a pair of winches and some clutches to the cabin top, and a pair of deck organizers to keep the lines away from the hatch when open. I then added a downhaul for the spinnaker pole and some twing lines for better control of the sheeting angles for the sheet and guy. The twing lines also lead back to the cockpit, I can control them from the helm if needed. With the controls for the chute done, next was the mainsail.
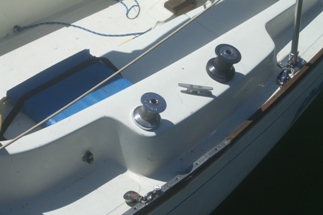
The cam cleat just forward of the winches works out very well for the twing lines which run forward to a block on the outer track. A Holt Allen dinghy snatch block worked out well for this.
The mainsail only had an outhaul which was hard to use. It was a piece of track that had a sort of pin stop set-up. It also did not have enough purchase to flatten out my open footed main. I removed the track and added a block to the existing cable leading to the clew of the sail. I now have a 3/16 line attached to the boom and run through the block to a cleat, which is much easier to use and has plenty of purchase. Adding the small block and clamcleat to the outhaul works much better than the original system.
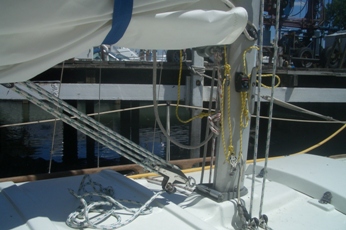
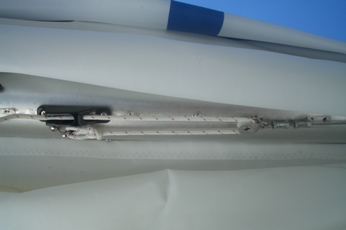
I also added a 4 to 1 vang control which is pretty straight forward. The cunningham is a little harder to explain, so check out the photo, but it's attached to the mast on one side and runs through the sail to some blocks and a cleat on the opposite side. The last thing to do then was a reef line. I sail in the Great Lakes, so talking with my sailmaker we decided a single reef was all that was needed. This being the case I decided on a single line reef set up. I think they also call this a jiffy reef. Harken I believe has some good photos in their catalogue of this type of set up. Which reminds me, I also changed the traveler to a Harken small boat system. Much easier to use than the old pin stop type that was on there. The Spinlock power cleat with the wedge installed, worked out very well for the cunningham (yellow line). I use a snap shackle on the lower fiddle block of the vang attached to a padeye near the shrouds to double as a preventer when going down wind. Okay, mainsail, done!
.
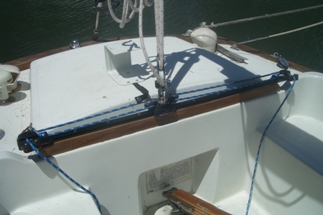
The new traveler. I also added the mount for a horseshoe buoy.
The headsail was pretty straight forward. All I really had to do was add a track inboard for the jib. My sail maker was good enough to get me some measurements for the location. I also want to replace my outside track with a racing type t-track that is a bit longer. The existing track is only bolted to the hull every other bolt, and the others just go into the teak toe rail. I am finding the teak is just not strong enough anymore keep the screws. It also is not long enough for a proper trim of my #1 genoa. I have also been thinking of adding a foil instead of using the hanks. This gets pricey with the reworking of all my headsails on top of the cost of the foil. Boat, Bring Out Another Thousand......
Now, I would like to give some more detail on leading the running rigging aft. At least how I did it.The first step was a spinnaker halyard. This was simply a matter of attaching a block to the masthead. Although, I have been thinking a double block for another halyard might be handy. Next, was a topping lift. This was a little more difficult. I cut an exit block into the mast about 3/4 of the way up, and added a simple exit plate about eight feet up. The hard part was getting the line run through the mast. An electrician’s fish tape came in handy for this.
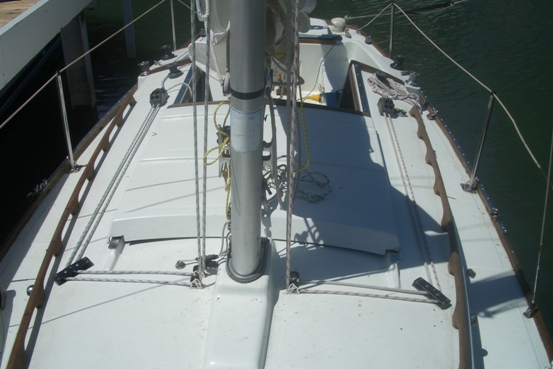
I now removed the winches from the mast, and added four mast base blocks. One for each of the halyards and the topping lift. I secured these with bolts through the cabin top with a piece of teak underneath to give a little more strength. From there I set a pair of deck organizers on either side to run around the hatch. The lines then lead aft into a pair of clutches and to a winch behind each clutch. Each of these was secured through the cabin top with a bolt and large washer. I did not feel any additional reinforcing would be necessary, and have not had any problems yet. The hardest part of this step was getting the bolts the right length so I could use the acorn type nuts to protect from sharp edges. I later added a downguy which I ran through some strategically placed padeyes to a cam cleat next to the clutches on the port side. The twing lines I just ran through a small block on the outer rails to cam cleats just in front of the primary winches. I also added two more winches behind the primaries to make it easier when we change headsails. This setup works well for racing, and also for single-handed sailing. If I did more singlehanded sailing, I think I would add a roller furling and an auto-helm. And possibly run my reef line back to the clutches. Also a jack line for a safety harness would be in order, right in the middle of the boat somewhere. Maybe from the mast back to something? I haven't quite figured that one out yet. The standing rigging is really my last rigging project. I will be doing a replacement over the winter this year.
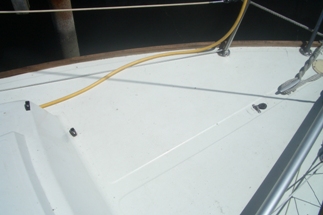
The cam cleat next to the port side clutches is for the downhaul, which I don't use unless needed to stabilize the pole. It runs through a block I mounted on the foredeck, and through a couple of padeyes to the cleat (see below).
At this point, I am on to the cosmetics, and the bottom. I have not done much yet except to sand off the peeling varnish and oil the teak. I will update this portion when I get it done. I also added shore power and a GPS, and the 12v wiring could use cleaning up. My main priority was to get racing, and make the boat look pretty later. I have to say that I have heard a lot of nice comments on this boat. She may be aging, but she still has nice lines, and people still seem to appreciate that. Even in this age of ultra light sport boats. The S&S team should be proud, that we still hold our own while racing. Well, the wind is up, and I am going sailing. Hope to see you on a race course!
************************
|


