|
So here's the problem. You have a custom built trailer made from the the steel cradle that came with your boat. You want to use that trailer for another Dolphin you happen to have sitting on poppits in your yard, or want to do some work on your centerboard which cannot be lowered to the full down position on the trailer, or you want to bottom paint under the front trailer poppits. I know you guys with the Triads have the yard do all this work, but this system probably works for you too.
First, you find a guy that used to own a small marina in the old days. He tells you about the poppit sling he used to use in his yard to do this kind of work. Since this guy, now retired, will no doubt have a small metal fabrications shop and can machine, weld and build all kinds of neat stuff, including ss parts, you ask him to make you a couple of these poppits.
|
|
Sling poppit technology...
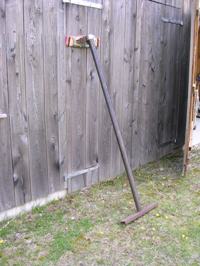
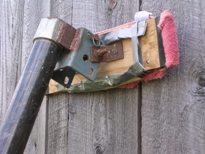
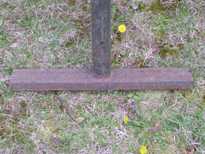
Basically, they are heavy wall steel tubes about 2 1/2" " in diameter and about 6' 8" long with a 3' piece of angle iron welded at one end as a foot. The other end has a threaded collar that allows some verticle adjustment and swiveling adjustment. To this collar is welded a small, but strong hinged steel/wood plate with a couple of 1/2" bolts. You fasten the loops of a 3" wide polyester (not nylon) lifting strap using these bolts. This is one of the poppits for the sling.
|
|
|
|
The Pad - hinge technology |
The Pad - pad technology |
Base technology |
March 16, 2010 Webmaster Note: Recent interest in reproducing this system has resulted a few new pictures.
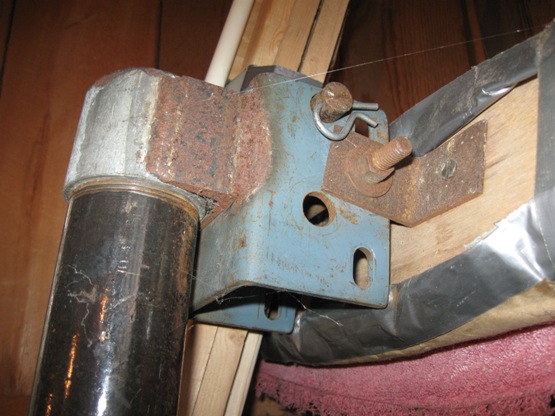
This is the heart of the system. The cap threads on to the pipe - allowing both some height adjustment and hull orientation. Note: The threaded cap and pipe are standard items at a good constructions materials dealer. The cap bracket has 2 pin placements - in the picture the sling pin is at the top location, and 3 possible wood pad bracket bolt placements. The bracket can pivot on its bolt to orient the pad. Click here for a large scale view
|
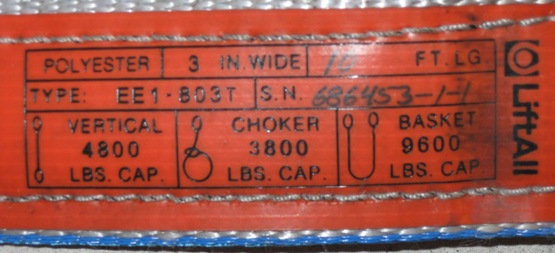
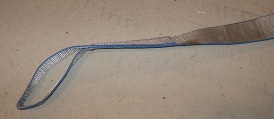
Above is the specification patch information on the sling. It is 10' long and has a 9600 lb 'basket" capacity - about a 2:1 (100%) safety factor. It will stretch a little under the load but the biggest problem is to get any slop/twist out of the system - its hard to pretension. A nylon sling will stretch too much.
The loops are 10" long, and the sewn overlap is about 9" long. Picture at left.
|
Now the fun part.
1. If you are doing this operation in a barn, make sure you have enough overhead clearance. We have 10' - I wish I had 12'. Doing it outside is a breeze as you know that if the whole thing tips over it won't take the barn with it. Actually, I would not undertake to do this outside in a strong breeze....
2. Using light chain, tightly loop a few feet around each axle/spring/frame and secure the chain with a bolt that passes through the links so that the spring does not spring up your trailer frame when the load comes off. This reduces the height that you have to raise the boat so you can slip the rear trailer poppits past the 'underbelly' of your boat. Block your trailer wheels securely..
3. Lower the boat as low on its front trailer poppits as you can, and raise the rear trailer poppits as high as you can - for the same reason as 2.
|
|
4. Lower the trailer tongue jack as low as it will go. This raises the back end of the boat.
5. Put 2 regular poppits under the rear end of the boat as close to the trailer poppits as you can get them and adjust their screw jacks snugly to the boat. Chain them together.
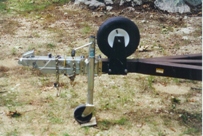
Webmaster Note: Want to know what that big wheel is? Click here
|
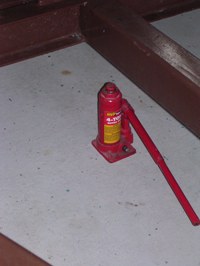
6. Place a small hydraulic jack - with at least 4 ton capacity - in the center and under the front main cross beam of the trailer. Add wood blocking on either side under the cross beam to keep the front end on the trailer secure and level in case the jack slips or tilts. As you jack up the frame the weight of the boat comes off the rear trailer poppits and on to the regular poppits you set up in 5. Use little scraps of wood to cushion the jack drive pin against the bottom of the frame.
|
7. After checking your front port and stb wood blocking under the frame, slowly release the hydraullic jack and let the frame come down on the blocking. Place some wood blocking under the hydraullic jack and repeat 6. Depending on the length of the jack drive pin, usually only about 3" - 4", repeat this process until you think the rear trailer poppits will have enough clearance, plus a couple of inches, to slip under the underbelly of the boat when you pull out the trailer.
|
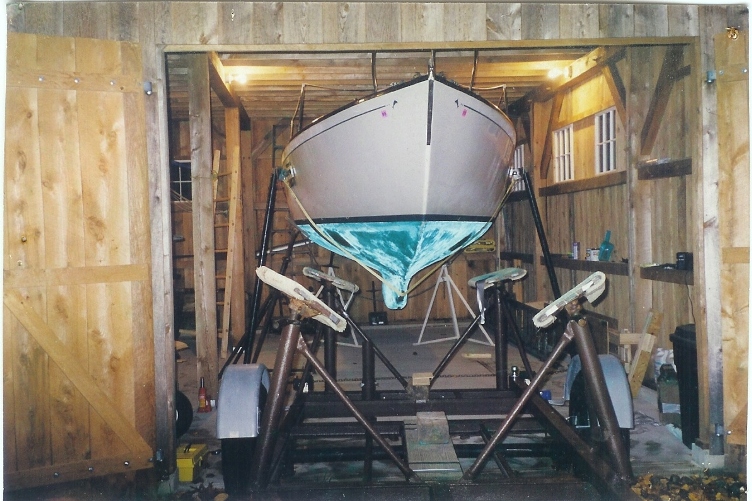
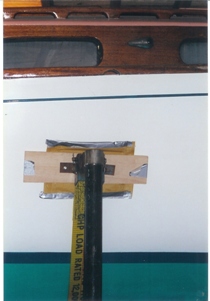
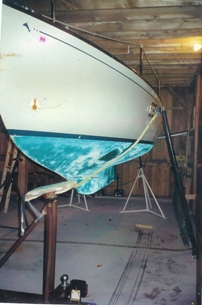
8. Place the poppit sling under the boat just in back of the front trailer poppits and stand up the poppits so that the wood pad - which should be covered with a thin, soft, smooth finish, easily sliding pad - rests against the hull. Adjust the sling as snugly as you can. This is when you wish you had more carefully determined exactly how long that sling should be. Chain the bottom of the 2 sling poppits together - make sure the chain cannot slide up the pipe. A small stud welded near the bottom of the pipe would be a help. Some day. The top of the pads should be at the same position on each side of the hull. In this picture the trailer has just been pulled out. Click here for larger image.
Note: Those spots on the port bow are rust on the scanned photos, NOT on the hull! I have these photos pinned to the inside wall of the barn to remind me where I put these things.
|
There are three positions for the bolts that allow some adjustment - see the "pad" photo above. The poppits can be moved closer to the boat, but you need the poppits to maintain a decent minimum angle against the side of the boat so that when the weight settles on the sling any shifting of the boat will not cause the poppit to approach vertical. When this happens, the unthinkable can happen.
9. Using the hydraullic jack raise the trailer a bit, remove equal amounts of the frame blocking on either side and ease the jack down until the trailer rests on the lower blocking. Do this progressively until the weight of the boat is on the poppit sling and off the trailer front poppits. At this juncture it is useful to point out that this operation is carried out with you wedged in the trailer frame and under the boat! Check your blocking - and make sure your trailer wheels are well blocked!
10. Stand back and look at your handiwork. If the poppits are at about the same angle to the boat - and are at the same positions on either side of the hull - this is a good thing. If they are not, the boat's weight shifted, and you may want to reset the sling and adjust the poppits.
11. Lower the trailer poppits as low as they will go and and raise the tongue end of the trailer with the tongue jack. Carefully pull out your trailer. If you have not provided quite enough clearance for the back trailer poppits to get by the underbelly - read this. When careful planning and measurement did not suffice I built a 6" high, 6' long wood ramp and pulled the tongue jack wheel up on it until the trailer was clear. This is when that couple of inches mentioned above gets real meaning.
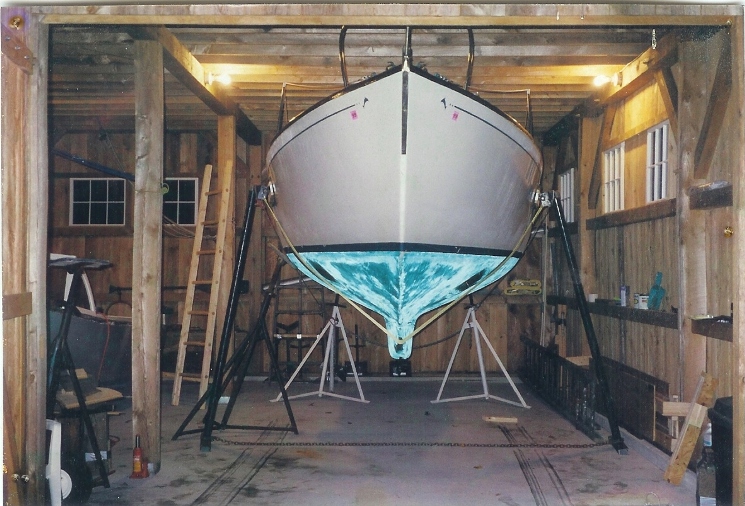
Those who have not read Marionette's Barn in the Stories section, and are gazing at the mostly hidden bow pulpit, may wonder how this boat got into the barn in the first place. This opening has a 3rd door, a horizontal one that lifts up.
12. Place 2 regular poppits under the front of the boat and snug them to the boat. Voila!
In these 2 last photos I have not yet placed the two front poppits. An observent viewer will notice, no doubt, the presence of a conventional poppit just aft of the starboard sling poppit on the far left side of the last photo. When I sense a slight tilt of the boat as the weight comes on the sling poppits, I stop the slow descent of the hydraullic jack and place a conventional poppit against the tilting side. Somehow this makes me feel much better.
Note: A polyester sling will stretch some, and its impossible to really pretension the sling with this system. An improvement would be to have the pad bolts pass through a tube that could roll freely. Then attach a steel triangle to the sling loop and use some kind of multipart vang system attached to an eye welded to the base of the poppit. Some day...
Note 2. You may wonder why I don't have a power lift system set up in the barn using the overhead beams. The answer is $$$, and that that does not solve the problem for the 2nd boat sitting on the trailer outside the barn. As I lay squeezed between the hull and the trailer frame I think a lot about a portable power lift system - some people call them travel lifts.
*******************************
May 19, 2017 - check out Paul Lugin's System http://dolphin24.org/245barn.html
*****************************
.
|


