|
October 10, 2010. Jonnie Walker, Yankee #227, sent in an interesting report on a centerboard trunk repair he made. Here is his report (edited).
Hi Ron,
Just an update.The deck is done, and I am working on painting the cabin before putting it back together! I had been out of town for two weeks and it rained - filling up the bilge....! When I came back I noticed a leak coming out onto the trailer.
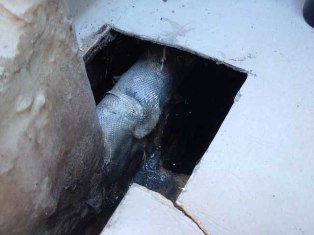
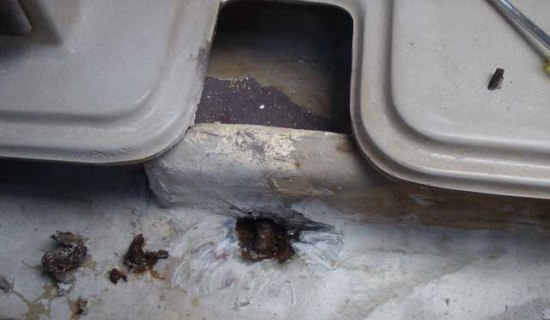
So I e-mailed prior owner Chris and asked him about the centerboard trunk patches that had been done. We surmised that on the top of the trunk was the probable offender. In the picture at left I have cut away the floor - you can see by the picture that it was not 100%.

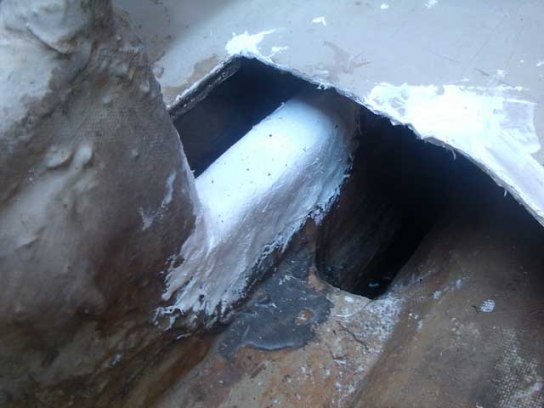
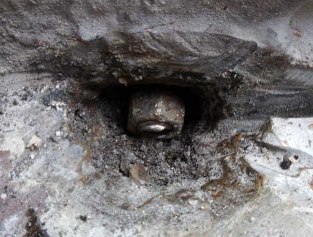
I ground the glass cloth off and there was a dark area, and I could wiggle my screwdriver into it....definite crack - drilled down and it went through real easy....too easy.....Then I drilled a series of 3/8" holes and tried to figure out how best to fix it.... I ended up shop vaccuming out the debris and using a Dremel Tool with a mill bit. I opened the hole up smooth and got out a lot of the loose glass fibers. At left is a picture of the cleaned up hole and you can see the top of the centerboard the picture is. To the right of the CB trunk at the top right corner of the picture is the cutout for the deeper section of the bilge.
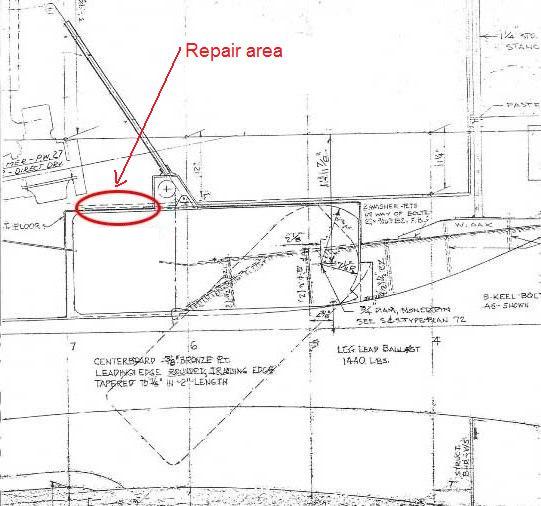
This drawing shows the exact location of the repair
Then 1 milled in an edge under the hole....put a few dabs of marine-tex on the edges and then placed a precut piece of glass cloth in and used a 1/8" piece of stainless pinstock to push it into position....then I put the last side down from the top and filled in with 1/4" marine-tex on top of that to fill the hole. Then another piece of saturated glass cloth over the whole trunk, and a 2nd larger over the first - wrapping both pieces down the sides. I stirred the marine-tex in the hole to make sure there were no air bubbles.
All in all I felt really good about the patch....I don't think I contacted the centerboard at all. I think I bonded to solid glass all round, and I am pretty sure thats where the leak was coming from.
Monday, I will fill it back up with water and see if it holds...but my guess is it does hold!
Jonnie
Stay Tuned!!
October 12, 2010. Here is the latest (minor edits)
Good news and bad news. The patch I did is water tight! But I found another old patch further forwards....and its leaking!
After looking around for the leak....and consulting with Chris, I surmised that it was that rear patch....the glass work was questionable and the resin didn't fully kick. I ripped it out...and did a new patch.
I filled up the bilge and drip drip drip drip. This time I thought it was coming from more forward....so I got some food coloring in different colors and gently dropped it into the water so I could watch the movements I used green on one one side of the CB trunk and blue on the other.
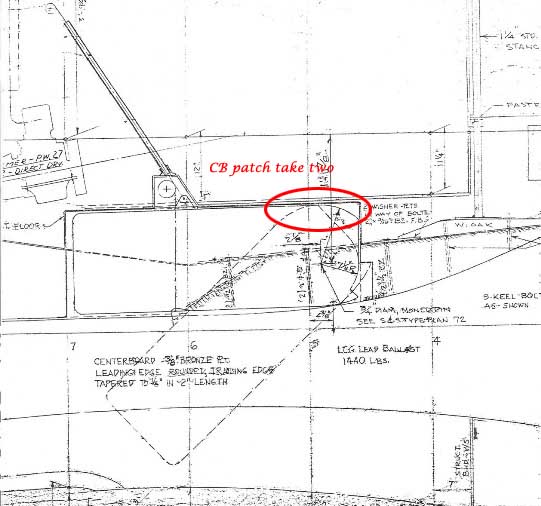
It took a while but I saw a place in the green starting to clear (clean water being sucked in) VERY slowly. After an hour or so I was able to see green traces on the trailer boards so I think it is this forward patch. This patch is in the T shaped bilge hole directly next to the dinette.
The forward patch is pre any of the owners I've been in contact with (I'm in contact with three previous owners). Now that I'm looking close at it I am wondering if someone re-pinned the centerboard there like on Canopache #188.
I'm going to take the grinder out there today and see what I can find....but I'm now pretty sure the leak is coming from there. Of course I was pretty sure it was coming from the rear one also. Albeit, I do not think it was a waste of time to re-do the rear patch.
I'll get some pics as I go. Wish me luck
Jonnie
Stay tuned
October 13, 2010 - Continuing...Jonnie emails (consolidated and edited)
Hey Ron,
I documented ok today and I have pics also. I ground into the #2 patch and very quickly had a hole through it....not thick at all....then ground down into it and found a springy substance.....silicone.
I ground the other side and figured it out.....someone has either replaced or (I hesitate to call it repaired) the centerboard. The patch was over a replacement pin.....bolt rather, and it was definitely leaking....it was all wet inside.
I really was not ready to deal with the centerboard but it seemed like a good time so I cut the bolt and got it out....and then was able to drop the centerboard.....not as easy as I would have liked. The boat's keel is too close to the trailer to get it all the way out so I think I'm going to do the jackstand dance tomorrow and try to get the back end of the boat higher up in the air.
Then a rain storm came in.....I think I'm glad.....
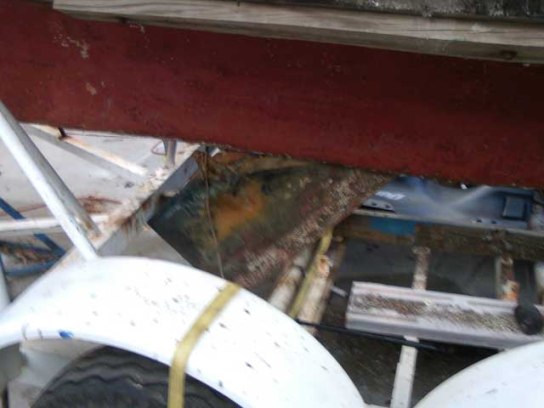
The centerboard has a defect of some sort on the starboard side...and its all the way out. I know the picture of it looks like its still pinned - it was just hung up.
Stay tuned
October 14, 2010. To read about the Centerboard Repair part of this project click here.
*******************************
November 22, 2010. Our technical staff has been working on the replacement pin part of the centerboard trunk repair project. Besides a fix that was strong and lasting there were some other considerations - like the potential for future leaks at this below waterline location, and accessibility for possible future removal of the centerboard. The plastic sleeve in the centerboard was 9/16" ID. The pin diameter was 1/2".
We asked Mark Steinhilber (Rascal), a marine architect and Dolphin 24 technical expert, for his thoughts. Here they are (edited)
When replacing the bolt, replace with the same material and alloy number that was originally there, stainless 316 for stainless 316 or silicon bronze for silicon bronze. Buy the 316 stainless bolt from a marine supplier rather than a Lowe’s or Home Depot because most home stores sell an alloy grade (maybe 306 or 304) that will have bad crevice corrosion in seawater. Marine stainless alloy is usually 316 stainless that is not susceptible to crevice cottosion like the other alloy grades. Better yet, Monel will last even better than 316 stainless, but is pricey or difficult to find. West Marine or some boatyards may stock what is needed, otherwise a monel , inconel, or stainless 316 bolt can be found from a fastener supplier off the internet.
Contact a fastener company and tell them the bolt is needed for use in a marine application that needs high corrosion resistantance, like Monel 400. Try one like:
http://nationalbolt.rtrk.com/?scid=2007704&rl_alt=http%253A%252F%252Fwww.nationalbolt.com&rl_path=/bolts.html
Or here’s one for 316 stainless:
http://boltsnutsscrewsonline.com/316-HEX-BOLT-1-2UNC-X-3-1-4.2623
Here’s another good source for silicon bronze and monel fasteners for boats. They have a good little galvanic series chart that shows the good, better, and best materials to use for a boat:
http://www.ccfasteners.com/cgi-local/browse.pl?type=topic&id=364&cart_id=970899361b877a5791e3e01d5d9a4ca8
Don’t go cheap on this bolt! $5 to $10 is definitely worth it. And, it will probably last another 50 years…
3M's 4200 is supposedly one of the best marine sealants around. If a big stainless washer can be used with a dog ear piece turned up to hit one of the hex faces and the fiberglass in the bottom of the recess to prevent the bolt from rotating, this might help keep the sealant watertigh Extra fiberglass overlay for waterproofing might not be needed, except for added insurance… Depends on how often you check the boat and if it is in the water only seasonal or year round.
Mark S
Jonnie's reply:
Sweet - I'll 4200 the pin in, and then glass it over. Thanks a lot.
Jonnie
**************
|


